By the time Father's Day rolls around, school has already been out for a few weeks — which means no classroom crafts for Dad this year! Home is where the magic happens instead.
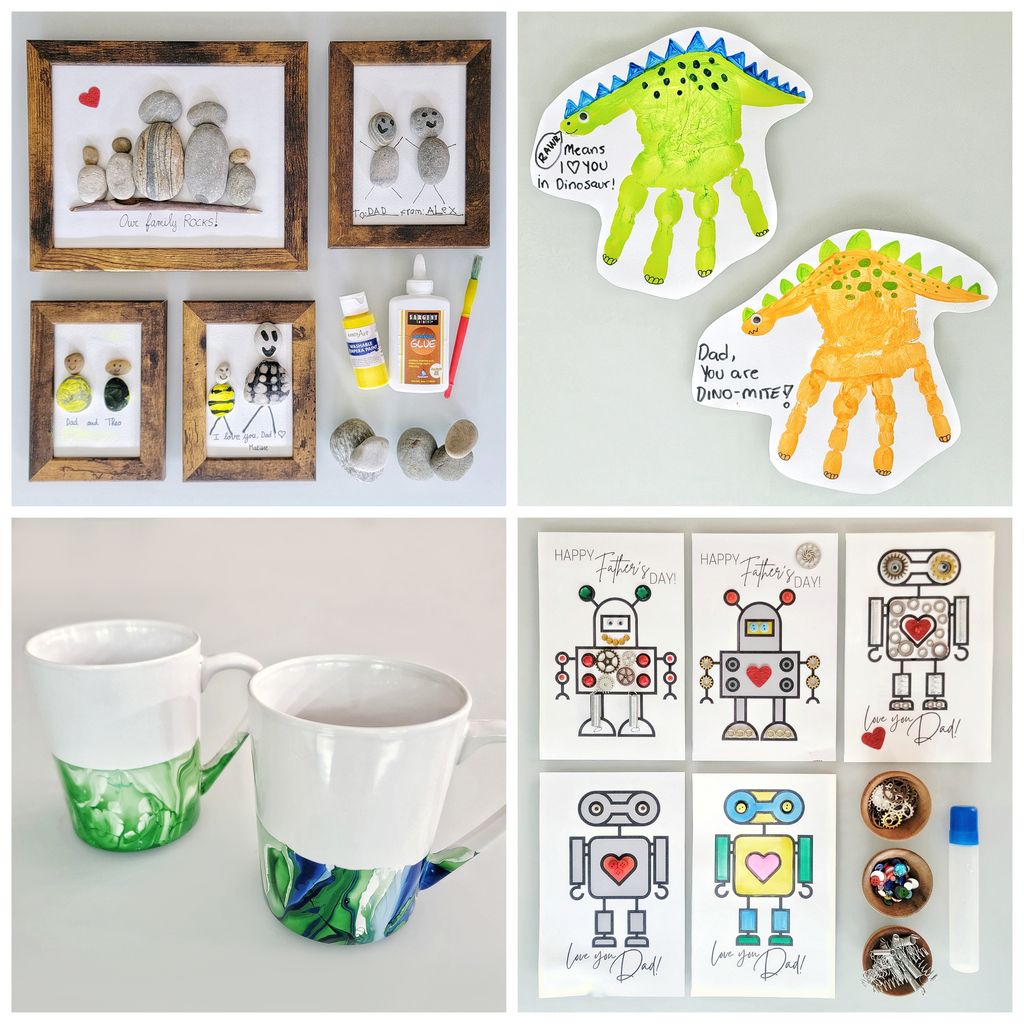
With these four Father's Day craft ideas, even the youngest kids can create something meaningful to give Dad. From a sweet handmade card to open-ended projects perfect for elementary-aged artists, there's something here for every child who wants to show Dad just how much he means to them.
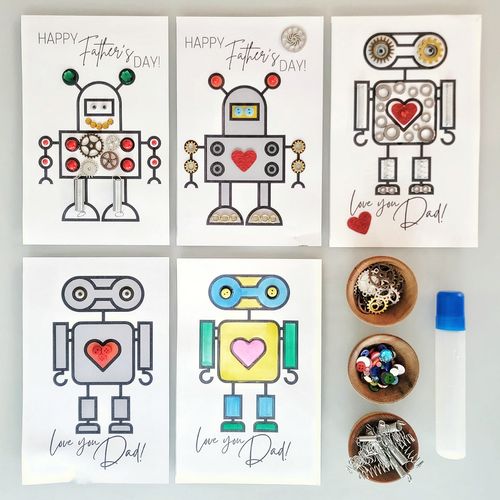
Kids can show Dad how much they love him with this Father's Day craft. Get creative and invite kids of all ages to customize their card and have their own gift to hand Dad on Father's Day!
Follow these simple steps.
- Download the card to your phone or computer.
- Print it on cardstock. Fold it in half along the centerline. (Young children may need help with folding the cardstock.)
- Write a message to Dad inside the card. Older kids may be able to do this on their own, but a little brainstorming help never hurts! You may want to do the writing for younger children, but they can still sign their name or draw a picture.
- Decorate the robot! Gather all sorts of materials. You can use leftover supplies from your art boxes or whatever other decorations you have on hand. To keep with the robot theme, you might use foil, small washers, googly eyes, and gray pipe cleaners. Set out glue or tape for kids to use in attaching the decorations to the card.
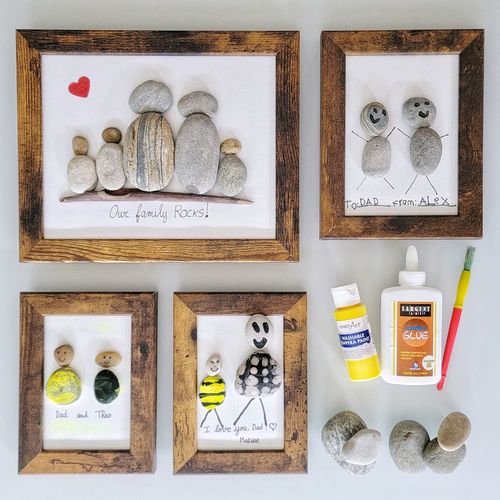
Nature is full of art supplies—including rocks! This project uses a variety of pebbles and other nature-themed supplies to create a one-of-a-kind gift that Dad is sure to treasure for years to come. You can feature your entire family or make it a "Dad and Me" piece of art.
Here's what you'll need.
- Small rocks and pebbles
- A twig or small stick
- Decorative stones (optional)
- Hot glue sticks and gun or another strong adhesive (adult use only!)
- White cardstock or canvas
Optional: a frame. If you are using a frame, cut the cardstock down to fit in the frame.
Here's how to do it.
- Go outside and gather supplies. You'll want to look for flat pebbles or small rocks, round ones for the heads and oval ones for the bodies. Pick up a variety of rocks you think might work for your gift.Where should you look for rocks? Here are a few options.
- If you have rocks in your landscaping, poke through there and you'll probably find something that will work.
- You can buy a bag of landscaping rocks at your local home improvement store or search the internet for "craft rocks."
- Don't take rocks from private property, nature preserves, or protected parks. In many places, removing rocks from nature is illegal.
Pick up a small twig or stick, too. Your rocks will sit on this, so be sure it fits within the width of the cardstock or canvas.
- Arrange your pebbles in a straight line on the canvas. Switch them around a few times to see which arrangement looks best.
- When you're happy with the look of the pebbles, glue your twig directly below them. Then, glue the pebbles down one at a time.
- Glue on decorative stones or any other features you'd like. When you're finished, gently set it aside to dry.
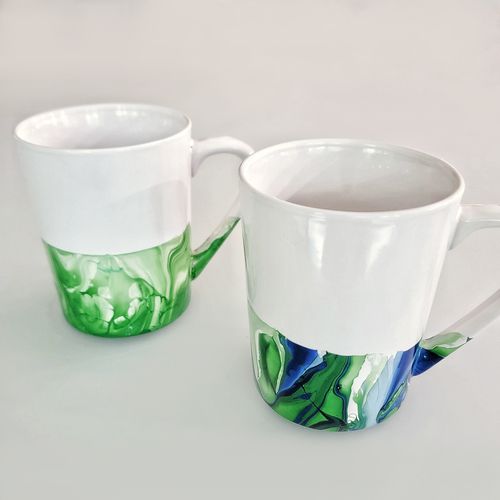
Did you know you can use nail polish to paint a mug? It's true! This project allows kids to customize the mug to Dad's favorite colors. It's perfect to pair with his morning coffee or to serve as a display piece on his desk.
Here's what you'll need.
- A white mug
- Fingernail polish and remover
- Warm water
- A disposable plastic bowl that's larger than your mug
- Toothpick
- Dishwasher-Safe Mod Podge or other sealant
- Paintbrush
- Cotton swabs
Here's what you'll do.
- Fill your plastic bowl with warm tap water.
- Drizzle a bit the fingernail polish into the water. You can use multiple colors to make it pop! Do a quick stir with a toothpick to swirl the nail polish. You'll want to work quickly here because the nail polish will start to dry and become gloppy.
- Dip the bottom of the mug into the water. (Be careful not to go too deep because you don't want the fingernail polish to attach to where Dad will be putting his lips to drink.) Leave it in for just three seconds and pull it back out. Turn the mug back and forth a bit to swirl the nail polish.
- Turn the mug upside down and sit it on a paper towel to dry. If you'd like, you can use nail polish remover and cotton swabs to remove the polish from the bottom of the mug.
- Once it's dry, use the paintbrush to apply a layer of Dishwasher-Safe Mod Podge or other sealant and allow it to dry.
- For even more fun, fill the mug with something Dad really likes! Think about candy, a bag of coffee, a gift card, or even a tie!
Note: Dishwasher-safe Mod Podge needs to cure for 28 days before washing. It's also recommended that you hand wash the mug or place it in the top rack of the dishwasher. If Dad doesn't want to drink from the mug and wash it, he can use it as a pencil/pen holder on his desk or display it on a bookshelf.
Let's give a big hand to all the awesome dads out there! *cue applause*
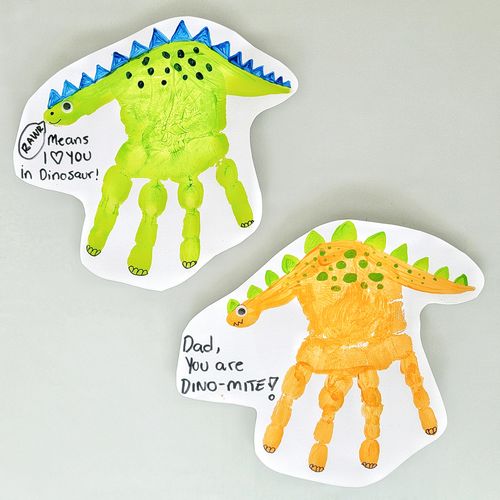
In this project, a simple handprint becomes an adorable keepsake. Plus, kids will have a blast making this dinosaur-themed Father's Day gift!
Here's what you'll need.
- White cardstock
- Tempera paint
- Paintbrush
- Paper plate
- Markers or crayons
Here's what you'll do.
- Squeeze a bit of paint onto a paper plate. Use the paintbrush to apply paint to one of your child's hands.
- Lay the white cardstock on a table. Instruct your child to spread their fingers apart and place their hand near the top of the cardstock. (The tips of the fingers will be the dinosaur's legs.)
- Turn the cardstock 180°. Guide your child to paint a neck and head for the dinosaur. They can dip their index finger or thumb into the paint and then repeatedly press it into the area above their palm print. A rectangle shape with an oval at the top will work just fine!
- Set the piece aside to dry for a bit. It shouldn't take more than 30 minutes.
- Use a black marker to draw scales and a face on the dinosaur. Above the dinosaur, write a message to Dad like “You're Dino-Mite!” Use markers or crayons to add other details.
- Glue the cardstock onto the green construction paper.