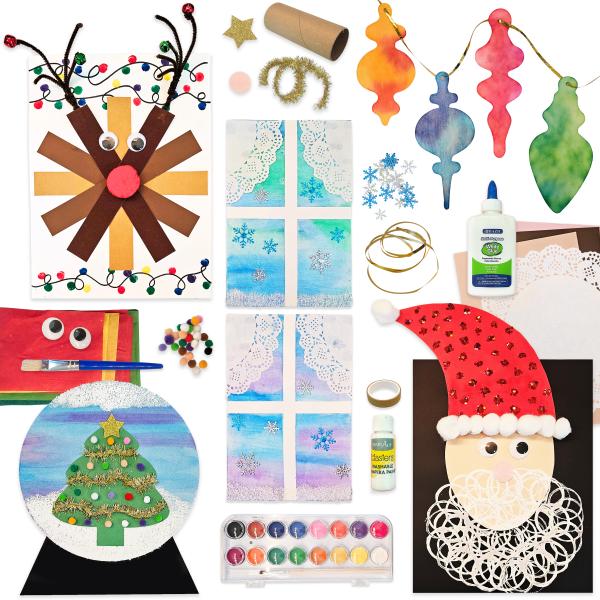
The countdown to Christmas has begun! But before you find yourself knee-deep in wrapping paper, set aside a few extra moments to create something special with your children. You’ll only need a few supplies to complete these five art projects. Plus, each one features easy-to-follow directions. Whether you’re home with the kids for a snow day or looking for a festive craft to brighten up your weekend, your family can make a meaningful connection through art!

You might also like this!
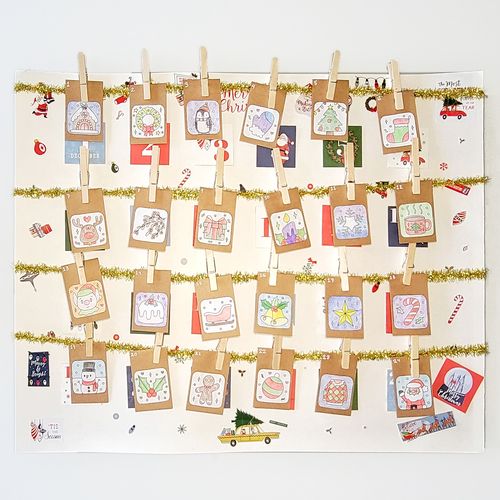
Use this advent calendar to add some extra fun to your family’s Christmas countdown!
What You’ll Need:
- Christmas coloring pages (FREE download)
- Large poster board, 25 small envelopes (we used 2.25” x 3.5” coin envelopes), twin or garland, and 25 clothespins
- Markers, crayons, or colored pencils
- Glue, tape, and scissors
- Christmas stickers to decorate the poster board
What You’ll Do:
- Start by downloading the FREE Christmas coloring pages and coloring them with markers, crayons, or colored pencils. Then cut the images out.
- Glue one picture to each envelope. Allow the envelopes to dry.
- Add a number to the top corner of each envelope, counting from 1 to 24.
- Put something special inside each envelope. Candy, jokes, coupons for special family activities, and LEGO pieces are just a few ideas!
- Decorate the poster board with Christmas stickers and your own designs.
- Tape twine or mini garland across the posterboard. You will need four rows in order to hang the envelopes.
- Using the clothespins, hang the envelopes in order with six in each row.
- Encourage your children to open one envelope each day in December!
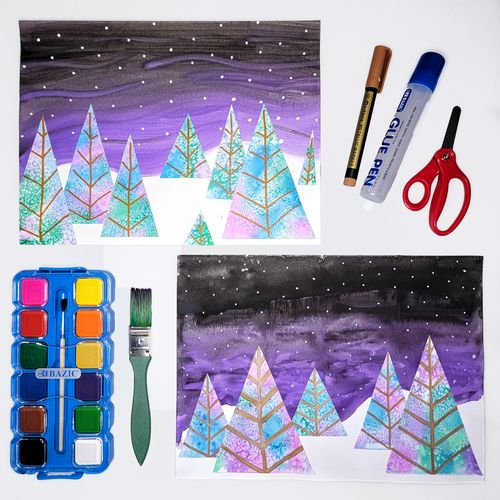
All is calm and bright in this peaceful winter wonderland scene!
What You’ll Need:
- Art tray or old baking sheet to use as a workstation
- Scissors, glue, and metallic marker
- Watercolor palette, paintbrush, jar of water, and table salt
- 2 pieces watercolor paper
- White cardstock, cotton swabs, and white tempera paint
What You’ll Do:
- Use watercolors to paint a wintery background on watercolor paper. Use blues and purples. Mix in a bit of gray and black if you’d like it to look like a nighttime scene.
- Paint a separate piece of watercolor paper with an abstract design. Use several colors like pink, blue, purple, and green. While the paint is still wet, sprinkle salt on top. Set the piece aside to dry. When it’s dry, shake the excess salt into the trash.
- Cut a wavy design from the white cardstock—this creates snowy hills! Make this piece a few inches tall and as long as your background paper. Glue it to the background.
- Cut triangles of various sizes out of the paper with the abstract design. These will be trees!
- Use the metallic marker to draw branches or other designs on the trees.
- Glue the trees to the snowy hills on your background. If your child is old enough, talk about perspective—the smaller trees look like they’re further away while the larger trees appear to be closer to you.
- Finish the piece by dipping a cotton swab in white paint and dabbing on the background as snow.
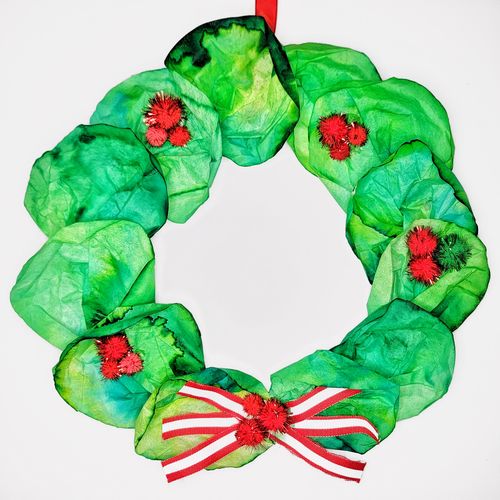
Add washable markers to coffee filters, spritz with water, and you’ll be on your way to creating a beautiful Christmas wreath!
What You’ll Need:
- Art tray or old baking sheet to use as a workstation
- 5-6 coffee filters and yellow and green washable markers
- Jar of water and paintbrush or spray bottle
- Glue and scissors
- Paper plate or piece cardboard with the center cut out (an adult should do that before starting)
- Red pompoms and Christmas ribbon
What You’ll Do:
- Working on an art tray, color the coffee filters with green and yellow markers. You don’t have to color every inch of the coffee filter, but make sure the majority of it is covered with color. Then paint them with water or spritz them with a spray bottle. Watch the colors mix! Set them aside to dry.
- Cut out a wreath outline from a paper plate or piece of cardboard. This will serve as the base sitting beneath the coffee filters.
- Cut each coffee filter in half. Bunch it together at the cut side so it looks a bit like a flower petal. Glue it to the base. Continue adding the coffee filters all the way around the base, slightly overlapping each one.
- Cut a few small strips of ribbon. Lay them near the bottom of the wreath to create a cross or star shape. Glue them down.
- Glue a few pompoms on top of the ribbon. Set the wreath aside to dry.
Optional: If you’d like to hang your wreath, make a hook with a pipe cleaner and glue it to the back of the wreath.
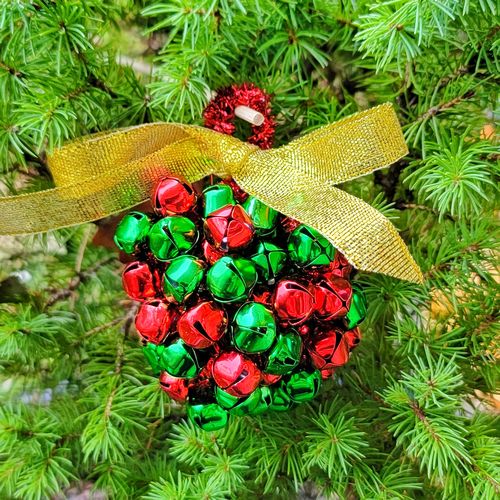
With just three simple supplies, you and your child can make a memorable ornament together!
What You’ll Need:
- 50 ½" Christmas bells and 4 pipe cleaners
- Scissors and christmas ribbon
What You’ll Do:
- Lay the pipe cleaners on a table so that they’re all crossing in the middle. Twist each one over the midpoint so they’re secured together. This will kind of look like an eight-legged spider!
- String the bells onto each pipe cleaner. Leave a little room at the end of each one for tying.
- Bring the ends of all of the pipe cleaners to the top and twist together.
- Take the twisted end and fold it over to create a hook.
- Cut some ribbon and tie it around the top for a finishing touch!
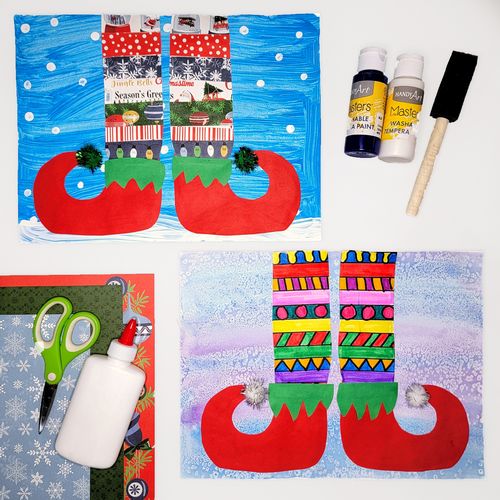
Kids can create a quirky elf and show off their personality in this project!
What You’ll Need:
- Multiple pieces of white cardstock
- Green and red paper
- Blue and white paint and cotton swabs
- Christmas-themed paper or markers
- Pompoms, glue, scissors, ruler, and paintbrush
What You’ll Do:
- Paint one piece of cardstock blue. This will be your background.
- Once the background is dry, orient your paper horizontally and use white paint to add a bit of snow to the bottom. You can also use the cotton swabs to dab a bit of white paint in the sky to look like falling snow.
- Draw two rectangles on a piece of white cardstock. These “legs” should be four to six inches long so they fit on your paper while still leaving room for the elf shoes.
- You can decorate the “legs” using one of two methods. Begin by using a ruler to make straight lines across the legs. For the first method, create designs with markers in each of the spaces on the “legs.” For the second method, fill in the spaces with Christmas-themed paper. Simply cut each piece of paper to fit the space. When you’re finished decorating, cut out the "legs".
- Cut elf shoes out of the red paper and cut fringe out of the green paper.
- Arrange all of the pieces on the background. Glue everything to the background and cut off any excess paper.
- Last, glue pompoms on the tips of the shoes.
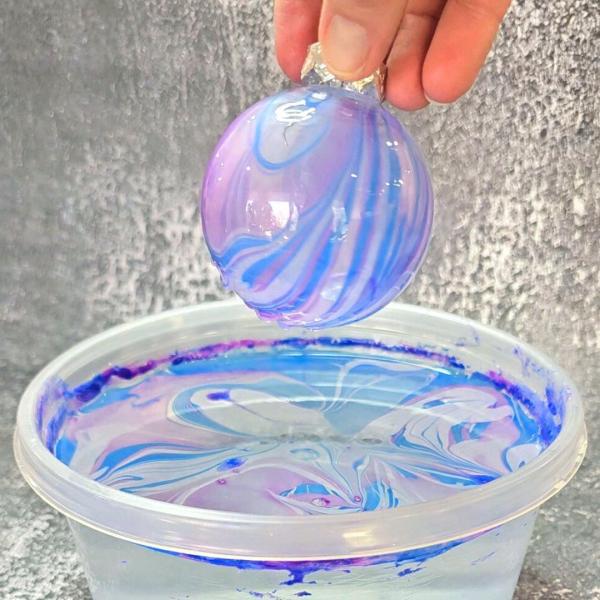
Did you know you can use nail polish to paint ornaments? It's true! This project allows kids to customize an ornament to their favorite colors. It's perfect to make a customized keepsake for Christmas!
Here's what you'll need:
- Plastic ornaments
- Fingernail polish and remover
- Warm water
- A disposable plastic bowl that's larger than your mug
- Toothpick
Here's what you'll do:
- Fill your plastic bowl with warm tap water.
- Drizzle a bit the fingernail polish into the water. You can use multiple colors to make it pop! Do a quick stir with a toothpick to swirl the nail polish. You'll want to work quickly here because the nail polish will start to dry and become gloppy.
- Dip the ornament into the water. Leave it in for just three seconds and pull it back out. Turn the ornament back and forth a bit to swirl the nail polish.
- Turn the ornament upside down and sit it on a paper towel to dry. Or, hang your ornament above paper towels.
- Once it's dry, hang your ornament in the tree!
PS: To discard the nail polish that's left in the container, let it dry and remove it from the water using a paper towel or a toothpick. Once there is not nail polish left in the water, you can pour it out. Discard the container as well.