Are you looking for a way to make this holiday season extra special? With these Thanksgiving craft ideas, you and your kids can throw a little crafting and connecting into your celebrations! We’ve suggested crafts for a variety of ages. Some of the crafts are simple and can be completed in less than thirty minutes. Others are more advanced and require several steps. Either way, we hope you find the perfect craft to help you unplug and connect with your kids this Thanksgiving. And, when you're done crafting, don't forget to check out our list of 16 books about Thanksgiving!
You might also like this!
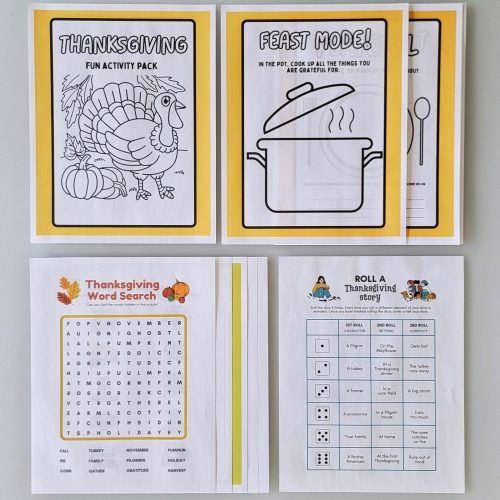
Get this free Thanksgiving activity pack to keep your little ones busy in the days leading up to Thanksgiving! Simply download the PDF and print it.
You'll get several independent activities like coloring pages, dot-to-dots, word searches, and mazes. There are family activities, too, like a memory game and a roll-a-story game!

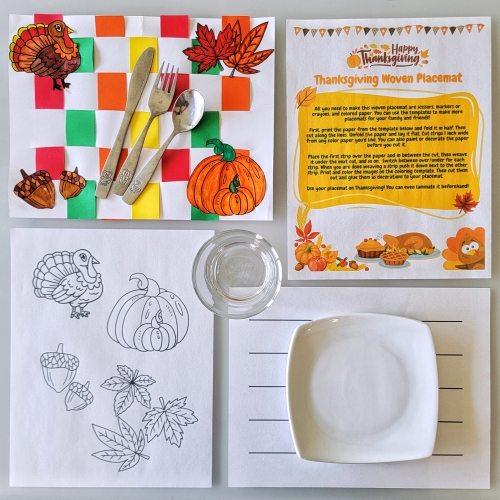
Spruce up your Thanksgiving table by setting one of these woven placemats at each seat! Print this free printable template and kids will know exactly where to cut in order to create the base of the placemat. After that, simply weave in strips of colored paper. The printable also includes a few fun Thanksgiving printouts for children to color and add to the placemat.
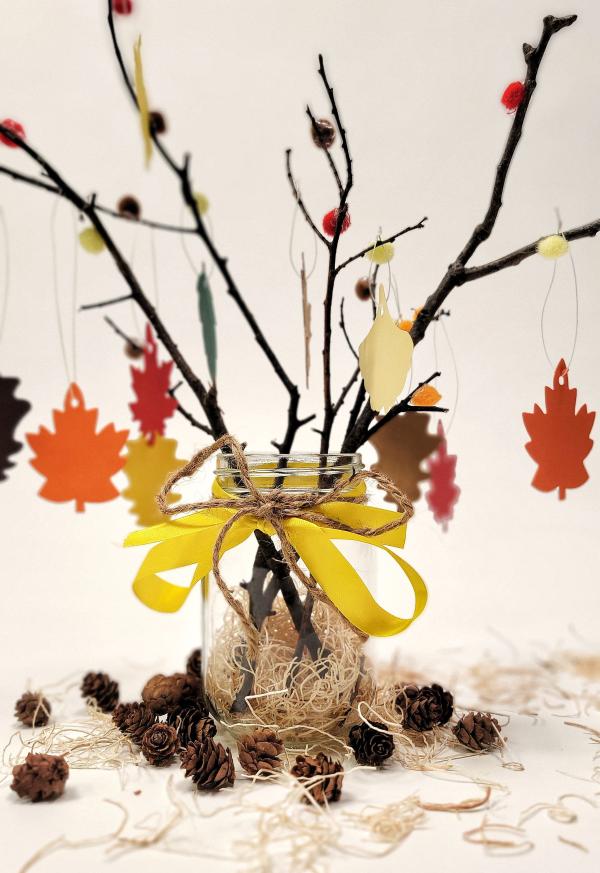
Here’s a way for the whole family to remember the things they’re thankful for. Plus, the tree makes a great Thanksgiving centerpiece!
What You’ll Need
- Scissors
- A mason jar
- Ribbon or twine
- Brown crinkle paper
- A fallen branch or two
- Small pompoms
- Hot glue gun (ADULT USE ONLY!)
- String
- Hole puncher
- Colored paper, cut into small pieces like leaf shapes or circles
- Pencils
What You’ll Do
1. Cut the ribbon or twine to size and tie it in a bow around the top edge of the mason jar.
2. Grab a few handfuls of brown crinkle paper and push it to the bottom of the mason jar.
3. Set your branch in the jar. If it’s too tall, you’ll need to trim it.
4. Put a few dots of hot glue on the branch and press pompoms into the glue. Keep going until you feel like the branch has enough color.
5. Punch a hole into each piece of colored paper. Thread a string through the hole and tie a knot in the loop.
6. Invite your entire family to write down things they’re thankful for on the pieces of colored paper.
7. Hang the papers on the tree and display it!
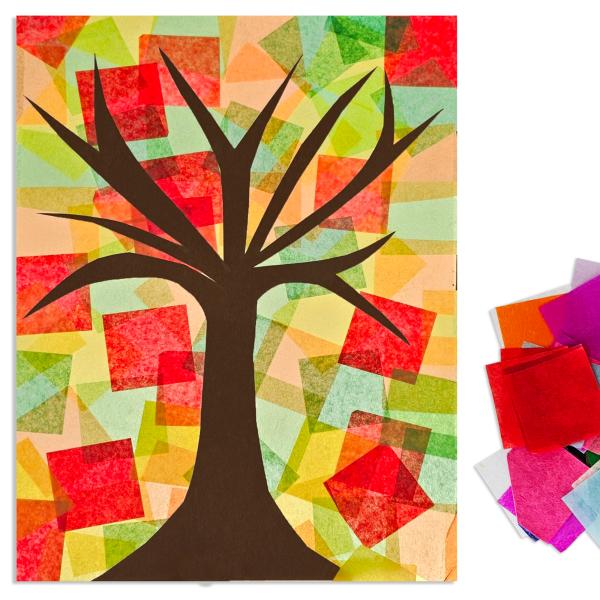
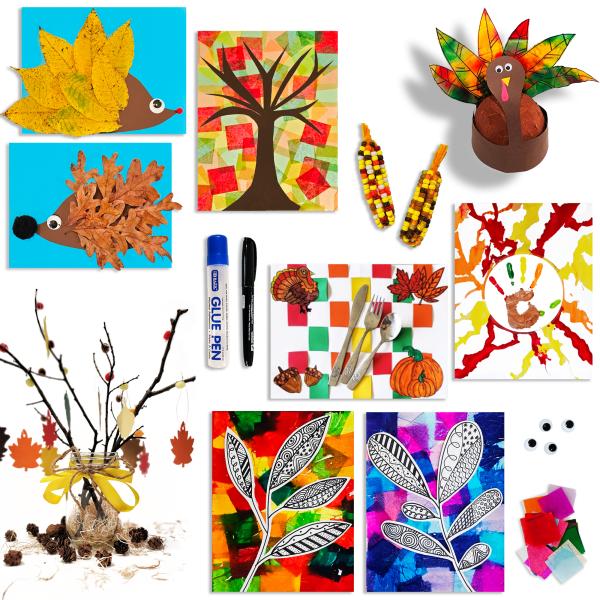
Bring the beauty of the changing leaves into your home! This is a mess-free project that little ones will love.
What You’ll Need
- Contact paper or Press N Seal
- Scissors
- Tissue paper in fall colors
- Brown construction paper
- Pencil
What You’ll Do
1. Cut a large rectangle out of contact paper or pull off a large portion of Press N Seal.
2. Fold over the top inch of the rectangle and press it onto a window. (If that doesn’t stick well, you can also use painter’s tape to secure the rectangle to the window.) Your contact paper should hang with the sticky side facing out.
3. Draw a basic outline of a tree trunk on the brown paper. Cut it out. Press it onto the contact paper, near the bottom.
4. Tear the tissue paper into small pieces and crumple them into balls. Press them onto the contact paper, above the tree trunk. Keep filling in the space above the tree trunk until it looks like a full tree.
5. Remove the piece of contact paper from the window and trim it as needed. Then press the sticky side onto the window to display it!
6. Make a few trees of different heights and colors to create a forest on your window!
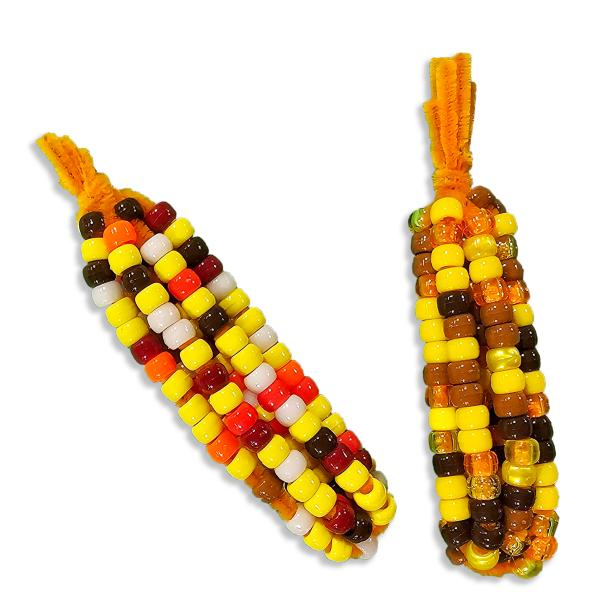
With just two supplies, this is a super simple Thanksgiving craft idea for kids. It’s also an engaging way for little ones to work on their fine motor skills!
What You’ll Need
- 4 12” Pipe cleaners
- Beads in a variety of fall colors
What You’ll Do
1. Pick up all of the pipe cleaners in your hand and line up their ends. Then pinch the mid-point and twist all of the pipe cleaners together.
2. Set the bundle of pipe cleaners on a table. Keep a finger pressed onto the point where you twisted them together. Fan out all of the ends of the pipe cleaners so that it looks like a big star.
3. Thread beads onto each arm of the pipe cleaners. Leave an inch or two of pipe cleaner at the end.
4. Pinch the twisted point of the pipe cleaner bundle and pick it up. The arms will drop to the side a bit and you can shape them, too. Bring all of the pipe cleaner ends together at the top of the corn cob. Twist a few times and fan out the ends. Your corn cob is complete!
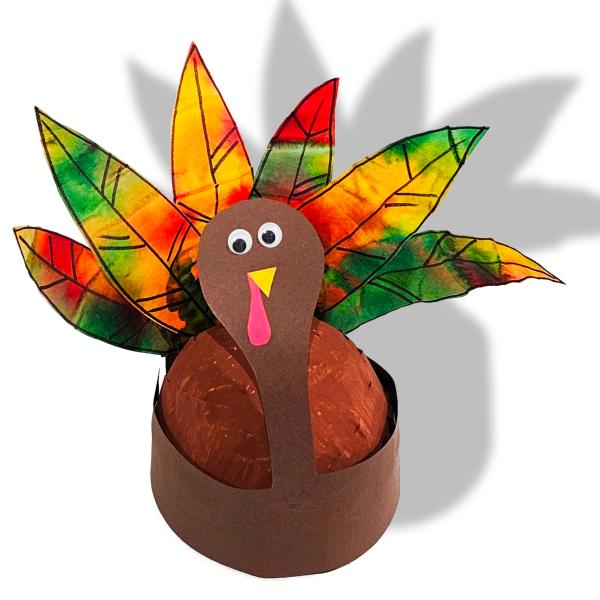
This paper mache project is ideal for older kids. It has several steps and lots of dry time, but the result makes a fantastic Thanksgiving centerpiece!
What You’ll Need
- Glue
- Newspaper, cut into small strips
- A balloon
- String
- Scissors
- Brown acrylic paint
- Paintbrush
- White cone coffee filters
- Washable markers
- Small jar of water
- Black permanent marker
- Brown cardstock, four sheets
- Small scraps of red, yellow, and black cardstock
- Masking tape
What You’ll Do
1. Start by using paper mache to make the turkey’s body. Grab a medium-sized bowl. Stir together ¼ cup of water and ¾ cup of glue.
2. Inflate the balloon and find a bowl to sit it on. You’ll want something to stabilize it while you add the paper mache.
3. Dip a strip of newspaper into the glue mixture. Run it between your fingers to get rid of the excess glue. Then lay the strip on the balloon. Repeat this process until the entire balloon is covered (but leave the knot uncovered). Two or three layers of newspaper are best.
4. Tie a string around the knot and hang the balloon to dry. Be sure to put a bowl below it to catch the drips of glue.
5. Once the turkey body is completely dry, paint it with brown acrylic paint.
6. Now you can move on to the feathers! Start by drawing several feathers on the coffee filters and cutting them out.
7. Color each feather with washable markers. You don’t have to cover all of the white, but be sure to add a decent amount of marker.
8. Now paint the feathers with water. As you apply water, the marker will run and create fun color patterns!
9. Allow the feathers to dry. Then use the black marker to add barbs to the feathers.
10. Pop the balloon inside the turkey. Throw it away.
11. Cut a wide rectangle from the brown cardstock—this is where your feathers will be mounted. Use the masking tape to attach it to the back of the turkey. It’s best to put it where the knot of the balloon was so that the hole will be hidden. Bend it around the body as needed. Paint the masking tape brown and set it aside to dry.
12. Once the body is dry, glue your feathers to the cardstock. Fan them out so they cover the entire piece of cardstock. Set aside to dry.
13. Now make the turkey’s face! Draw a large rectangle on the brown cardstock and add a large circle to one end of it. Cut it out. The round part will be the turkey’s face and the rectangle will be its neck.
14. Cut black eyes, a yellow beak, and a red waddle out of cardstock. Add the pieces to the face.
15. Now it’s time for the final steps! Cut a long strip of cardstock that’s about two inches tall. Wrap it around the base of your turkey body. If it doesn’t go all the way around, glue another strip of cardstock to it. You’ll want to have a ring of cardstock that will fit snug around the bottom of the turkey body.
16. Glue the bottom of the turkey neck to the cardstock ring. Set the turkey body inside the ring.
17. If your turkey doesn’t sit flat, you can make a stand for it. Simply create another ring out of cardstock that’s a bit smaller than the width of the turkey’s body.
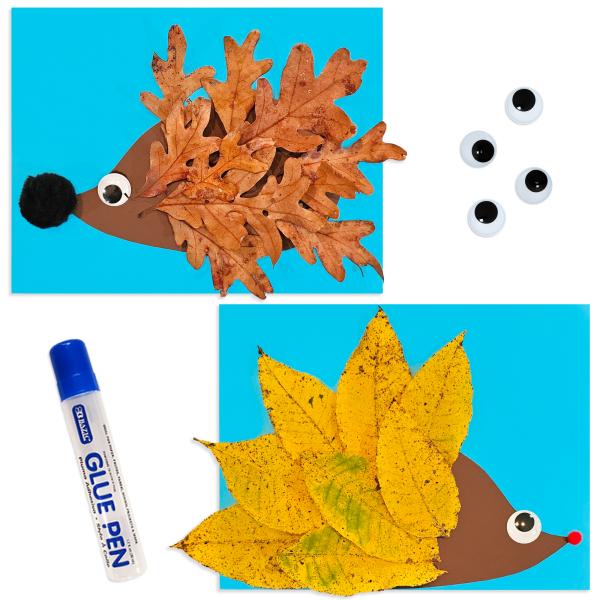
In the fall, hedgehogs are busy eating. They want to build up their energy stores before they go into hibernation. They begin hibernation right around Thanksgiving, so it’s fitting that this little animal is the star of the next kids’ craft!
What You’ll Need
- A few handfuls of leaves
- One piece of fall-colored cardstock
- One piece of brown cardstock
- Pencil
- Scissors
- Glue
- Black marker
What You’ll Do
1. Head outside to collect leaves. Aim to pick up a variety of colors, shapes, and sizes.
2. Draw a teardrop shape that takes up nearly the entire sheet of brown cardstock. Cut it out.
3. Glue the teardrop to the piece of colored cardstock. The rounded section will be the hedgehog’s body and the pointed end will be the face.
4. Remove the stems from the leaves. Glue them onto the hedgehog’s body with the pointed ends sticking out. Layer the leaves as you fill in the entire body. Leave room for the face!
5. Draw a nose, eye, and smile on the hedgehog.
6. Display your artwork!
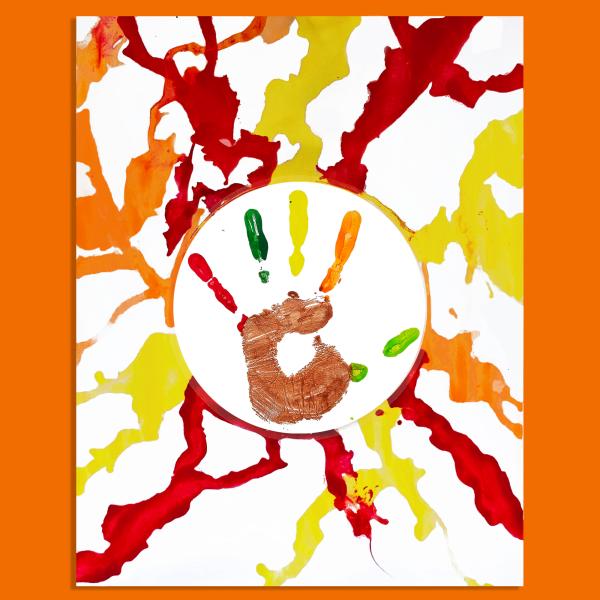
Here’s a keepsake Thanksgiving craft idea with a unique painting technique. Kids will use a blow dryer to paint the background!
What You’ll Need
- Washable paint in fall colors
- Paintbrush
- White cardstock, one sheet
- Colored cardstock, one sheet
- A small bowl
- A blow dryer
- Glue
- A black marker
- A red marker
What You’ll Do
1. Before you begin, make sure your white cardstock is a bit smaller than your colored cardstock. In the final step, the colored cardstock will form a kind of frame around the white cardstock. If it’s not the right size, trim the white cardstock.
2. Paint your child’s palm brown. Paint each one of their fingers a different color. Have them make a handprint in the center of the white paper.
3. Set a small bowl on top of the handprint. You want the bowl to cover the entire handprint but not extend too far into the white paper.
4. Squeeze blobs of paint all over the white paper. Turn on the blow dryer and aim it at the blobs. The paint will run and swirl to create fun color patterns!
5. Lift up the bowl. Set the paper aside to dry.
6. Once it’s all dry, turn the handprint into a turkey! Use the black marker to draw an eye on the thumb and draw a red waddle coming off the tip of the thumb.
7. Write your child’s name and the year below the handprint.
8. Glue the white cardstock onto the piece of colored cardstock.
9. Display your art!
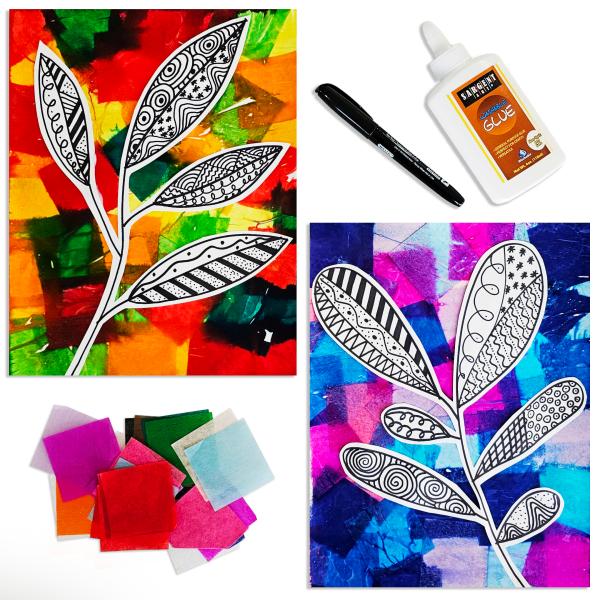
What is zentangle art? It’s the creation of patterns and designs that are “tangled” together randomly. And, the process of creating it makes the artist feel “zen.” There you have it: zentangle!
What You’ll Need
- White cardstock, two sheets
- Tissue paper in fall colors
- Small jar
- Glue
- Foam paintbrush
- Pencil
- Scissors
- Black permanent marker
What You’ll Do
1. Cut the tissue paper into small squares.
2. Fill a small jar halfway with glue. Mix in a tablespoon or two of water to create a thin mixture.
3. Working in small sections, use the foam paintbrush to apply glue to one area of the cardstock. Press a few pieces of tissue paper into the glue. Paint an additional layer of glue on top of the tissue paper. Continue like this until the entire piece of cardstock is covered. Set it aside to dry.
4. Now use a pencil to draw a large branch on your white cardstock. Draw a few large leaves coming off the branch. Trace the branch and leaves with black marker.
5. Use the black marker to make sections of patterns inside each leaf. You might do dots near the top of one leaf and triangles near the bottom of the leaf. You can draw stars, zigzags, swirls, waves, or any type of pattern you want! When you’re finished drawing, cut out the branch. Leave about a one-inch border around the branch and the leaves.
6. Glue the branch to the tissue paper background.
7. Display your art!