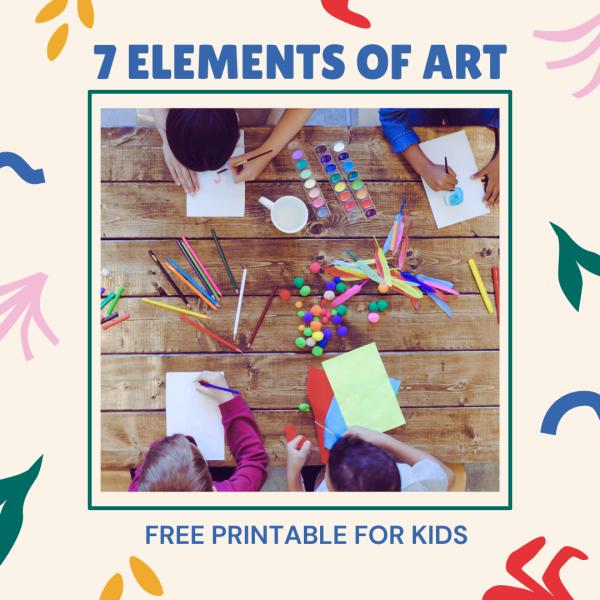
We all have a favorite piece of art, but have you ever considered why it’s your favorite? Is it the color or the forms or the way the space is arranged? All art is based on 7 basic elements. Learning how to recognize these elements can help kids become more successful in creating their own art and help them dig deeper into the famous pieces of art they see. We’ve put together a FREE printable that will guide you as you explore these 7 elements of art with your children. Plus, we’ve provided simple activities so your kids can get hands-on experience with each element.
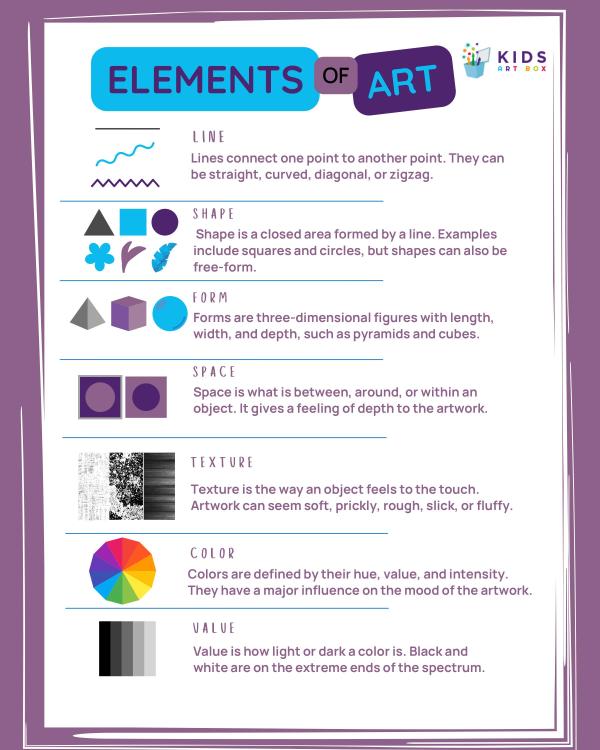
Here it is: your go-to guide for explaining the 7 elements of art to your children! This printable describes each element in kid-friendly language and gives visual examples too. The cover page provides a quick summary of each element—it’d look great hanging above your children’s art area. After that, there’s one page dedicated to each element. Work through it with your children and use the recommended activities in this blog to practice each element.

This is the most basic element of art. All of the other elements are based on line, so it’s the perfect place to start!
For young children:
Grab a big piece of paper and markers or crayons. Draw a few grid lines to divide the paper into sections. Encourage your children to scribble lots of different kinds of lines—straight, curly, zigzag, and others—in each section. Then add googly eyes on top of the scribble and draw on legs, arms, and other features to make the scribbles come alive!
For older children:
Grab a piece of paper and a black permanent marker. Divide the paper into several sections, like a grid or a tic-tac-toe board. Encourage your children to use various lines to make a unique pattern in each section. They may find it helpful to brainstorm first, so draw a few ideas on a piece of scrap paper. Use zigzags, wavy lines, intersecting lines, parallel lines, etc. When they’re finished drawing, they can use markers or watercolors to add color to the piece.
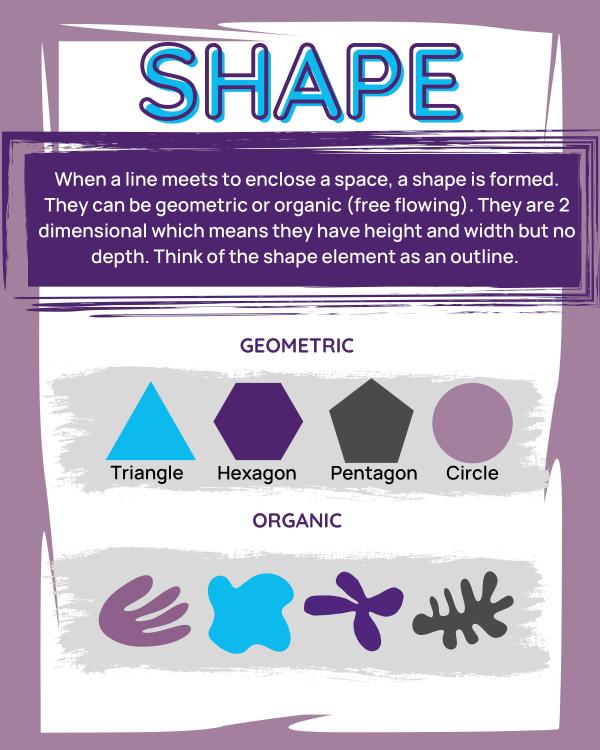
When a line meets to enclose a space, it creates a shape. These are 2D objects like circles and triangles.
For young children:
Cut several shapes out of construction paper. Try basic shapes the first time—circles, triangles, squares, and the like. Have children glue them on a piece of white paper to create an animal or a landscape. For the second time, cut out organic shapes of all sizes. These can have wavy edges and uneven sides. Encourage your children to make a really silly scene out of those pieces!
For older children:
Provide children with three or four colors of construction paper and one sheet of white paper. Their goal is to create a 2D robot on the white paper. For example, they may cut out a large rectangle for the body, a square for the head, circles, for the eyes, and a free-form shape for the hands. This is the perfect opportunity to get creative!
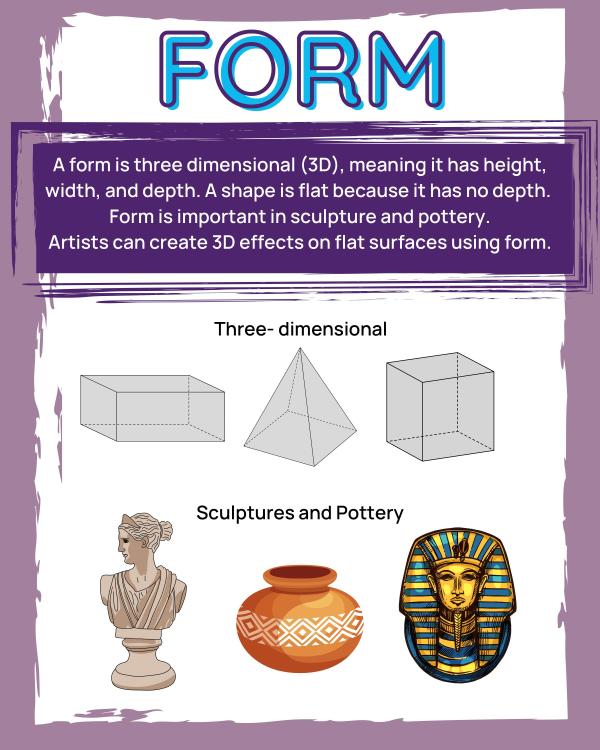
A form is 3D like a cube or a cone. It has height, width, and depth.
For children of all ages:
There are many simple ways to teach kids about form. One very non-intimidating way is to go around your town and look at architecture. Ask your kids what forms they see.
At home, you can experiment with form by making your own sculptures out of various materials. Clay is an obvious choice, and a great beginner’s project is a pinch pot. If you don’t have access to clay, mix up some salt dough, form it with your hands or with cookie cutters, and bake it in the oven. You can add color to your salt dough sculptures with acrylic paint or permanent markers. Older children may want to experiment with form by making origami.
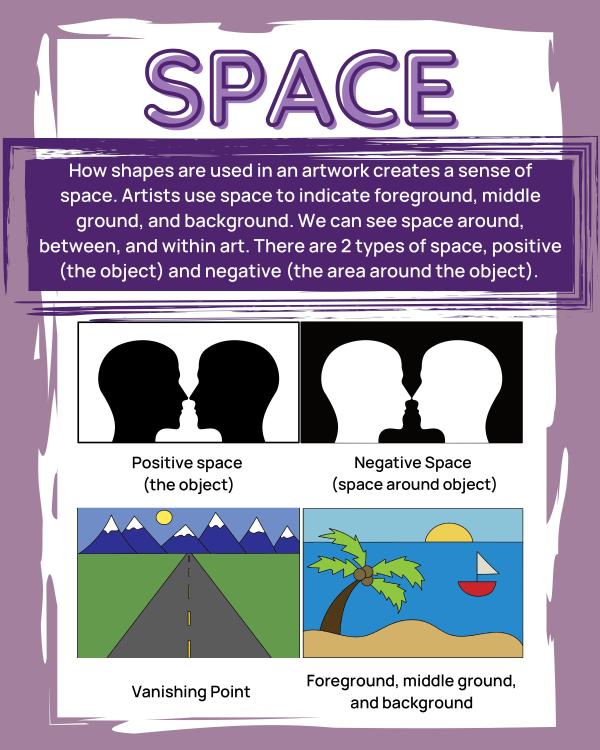
Space is created when an artist arranges shapes in a piece of art. Artists can create a foreground and a background or a vanishing point. There are two types of space: positive (the object/subject) and negative (the empty area between shapes).
For young children:
Use this idea to teach children about utilizing a background, middle ground, and foreground. The final result will be a field of sheep! Start with a piece of watercolor paper. Draw three overlapping hills—a big one that takes up the bottom third of the paper and two smaller ones that take up the next third of the paper. The top third will be the sky. Paint the piece using different values of green for each hill. Also paint the sky and leave some space white for clouds. Once it’s dry, use oil pastels or markers to draw flowers on the hills. Remember, the flowers on the hill in the foreground will be bigger than the flowers on the hills in the background. Then add sheep! Fluff out cotton balls and glue them onto the hills. Add a face and legs with a black marker. Again, remember space and perspective—the sheep on the hill at the bottom of the page should be big and the others should be smaller because they’re further away.
For older children:
Use the same basic concept as the project suggestion for young children, but add a bit more complexity. Children might want to make a different scene and use houses instead of sheep. Or, they could draw mountains and trees. There might be a lake in the background. Encourage children to use a few different ways to create the illusion of space in their artwork. They can overlap shapes, vary the sizes of objects, and blur or sharpen the focus of objects.
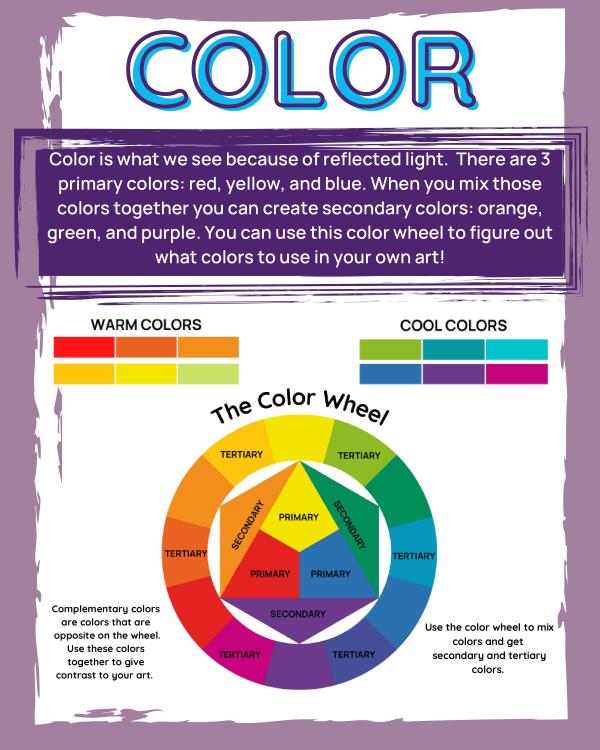
When light strikes an object and is reflected to our eyes, we see color. By mixing the primary colors, we can produce new colors. Colors can show emotion, create contrast, and indicate light.
For young children:
Grab a piece of watercolor paper and red, blue, and yellow washable markers. Ask the children to pick two colors. Color a one-inch circle with one marker. Then use the second marker to create a circle around the original color. Dip a paintbrush in a bit of water and paint over the circle. You’ll see the colors mix! Experiment with using a lot of one color and just a bit of another color. If you’d like, add in secondary colors and see how they mix.
For older children:
Upper elementary and middle school kids can create their own abstract color wheels! First, print out a color wheel for reference. Then divide a large paper into 12 equal squares. (Three-inch or four-inch squares are best, but adjust the size based on the size of your paper.) Label each square with the color it will become. Mix up paint for each square and paint all of the squares accordingly. Leave a bit of a white edge so that the colors don’t mix. While the paint is drying, cut an abstract shape out of cardstock. Be sure it will fit in the squares on your painted paper. Once the paint is dry, trace the shape in each square. Cut out the shapes and arrange them in a wheel-shape on a piece of black cardstock.
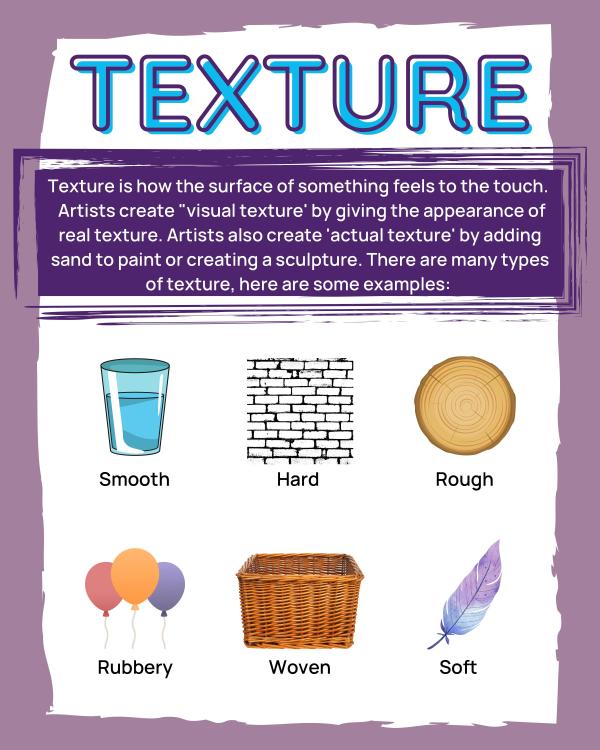
When you touch something, you feel its texture. Artists can use techniques to create the appearance of texture or they can add things to their work to create actual texture.
For young children:
Head outside for a walk and look for texture. It’s everywhere! While you’re out, collect several leaves. When you get back home, set one leaf on your workspace and set a piece of lightweight paper on top. Rub a white crayon on the paper (on top of the leaf) several times. Repeat all over the paper. Use several different leaves if you’d like. When you’re finished with the rubbings, paint the paper with watercolors. (Since the paper is thin, you’ll want to use as little water as possible.) The white crayon rubbings and texture of the leaves will pop!
For older children:
Older kids can create a relief sculpture to show off textures! First cut a large circle or square out of cardboard. A shipping box or a cereal box will work. Then draw lines, shapes, and swirls all over the cardboard. Trace the lines with white glue and press yarn into the glue. Place a few lines of yarn right next to each other to create a thick piece. After the yarn is dry, paint a thin layer of glue over the entire piece of cardboard. Press a piece of foil into the glue. You’ll want to press all around the yarn so that the texture shows through the foil. Glue the excess foil onto the back of the cardboard. Once it’s all dry, you can add color with permanent markers.
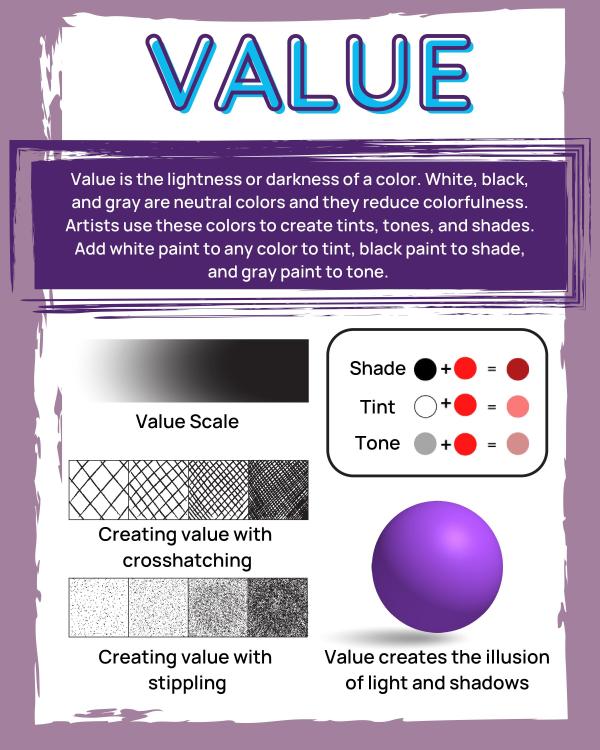
Value describes the lightness or darkness of a color. Artists use it to create the illusion of light and shadows in a painting.
For young children:
Grab a few paper paint chips from the hardware store. Cut them into squares and encourage your child to arrange them from lightest to darkest. Then make your own value scale from watercolors. On a piece of watercolor paper, draw a long rectangle and separate it into five squares. Leave the first square white. Mix up a very light black watercolor for the second square. Add a bit more black paint to that mixture and use it to paint the next square. Add more black for the next square. Take black watercolor directly from the palette for the final square. Repeat to create value scales for other colors.
For older children:
Put two concepts together to experiment with value and perspective in this project! You’ll be using various tints and shades of blue paint to create a swirling ocean scene. Start by making a value scale. On a piece of heavy paper, draw a long rectangle and separate it into five squares. The middle square will be your base color, so paint it with the blue directly from the bottle of paint. Then mix a bit of blue and just a touch of white on a paper plate. Paint that color to the left of the first color. Mix an even lighter blue by squeezing a new blob of blue paint and a few extra drops of white. That’s your lightest color, so paint it on the far left square. Now, make darker colors. First, mix a blob of blue with a touch of black. Paint that color to the right of the original square. Next, make a darker blue by squeezing a new blob of blue paint and adding even more black. That is your darkest color, so paint it on the far right square.
Now grab a piece of heavy paper and orient it vertically. You’re going to paint all of your colors in concentric circles. Start in the middle of the page and paint a circle with your lightest color. (Don’t fill it in—leave a white circle in the very middle.) Then surround the original circle with a circle that’s the next darkest color. Work your way to the very edge of the paper and use your darkest color last. Let it dry. Finally, draw some sea creatures using perspective. The creatures closest to the middle should be smallest since you want them to look like they’re far away.